> ## Documentation Index
> Fetch the complete documentation index at: https://docs.saasio.io/llms.txt
> Use this file to discover all available pages before exploring further.
# Pages & API Routes
> Learn how to create the fundamental structure of your Saasio application by adding pages for your user interface and API routes for your backend logic.
***
Every application you build in Saasio is composed of two fundamental building blocks. Understanding the distinct role of each is the key to creating a powerful, full-stack application.
Pages are what your users see and interact with—like a homepage, a
dashboard, or a profile section. They are the visual **front-end** of your
application.
API Routes are the invisible **backend**. They are server-side endpoints
that handle data, process requests, and communicate with your database or
other services.
***
## Supported Features: Dynamic & Nested Routing
Saasio fully supports the same modern routing patterns found in frameworks like Next.js. This includes:
### **Dynamic Routes**
You can define dynamic URL segments using brackets. These work for both **pages** and **API routes**:
Examples:
* `/user/[id]`
* `/blog/[slug]/comments/[comment-id]`
* `/product/[product_id]/specs`
Dynamic segments let you build flexible, data-driven paths without needing to hardcode all possible variations.
### **Nested Routes**
Routes can be deeply nested to match complex application structures.
Examples:
* `/dashboard/settings/security`
* `/user/[id]/posts/[post-id]`
* `/shop/[category]/items/[item-id]`
Saasio automatically converts your folder-like structure into the correct routing hierarchy and resolves dynamic parameters at runtime.
### Accessing Dynamic Parameters
When working with dynamic routes, Saasio automatically extracts the values from the URL and makes them available inside your workflows.
You can access them using:
* **Page Param** — when you are inside a **Page**\
Use this data source to read the dynamic segment values of the current page URL.
* **Route Param** — when you are inside an **API Route**\
Use this data source to read dynamic values coming from the API request path.
Examples:
* A page at `/user/[id]` accessed via `/user/42`\
→ `id` = `"42"`
* An API route at `/posts/[post-id]/comments/[comment-id]`\
accessed via `/posts/88/comments/12`\
→ `post-id` = `"88"`\
→ `comment-id` = `"12"`
These dynamic parameters can then be used in any workflow action—such as database queries, conditions, branching logic, or generating API responses.
Dynamic parameters work everywhere: regular pages, nested pages, API routes,
and deeply nested structures.
***
## Pages: Building Your User Interface
Your project's pages form the map of your application. When you create a new project, Saasio automatically includes two essential, non-deletable pages:
* **Home (`/`):** The default page users land on when they visit your main URL.
* **404 (`/404`):** The "Not Found" page shown when a user tries to access a URL that doesn't exist.
Here’s the step-by-step process for adding new pages to your application.
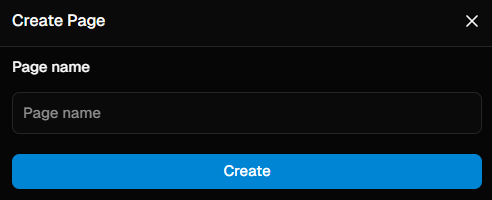
In the left panel of the Visual Editor, ensure the **Pages** tab is selected. This area lists all the pages in your project.
Click the **`+`** icon at the top of the pages list. This action opens a
prompt to name your new page.
Provide a clear, simple name for your page. This name will automatically become its URL path. For example:
* A page named `pricing` will be accessible at `your-domain.com/pricing`.
* A page named `about-us` will be accessible at `your-domain.com/about-us`.
 Once created, you can click on any page in the list to load it onto the
central canvas and begin designing its layout and content.
***
## API Routes: Powering Your Backend
API Routes are your application's connection to the server. They are essential for any task that requires secure or private logic, such as fetching user data, processing a payment, or connecting to another company's API.
Here's how to create one.
In the left panel, switch from "Pages" to the **API Routes** tab.
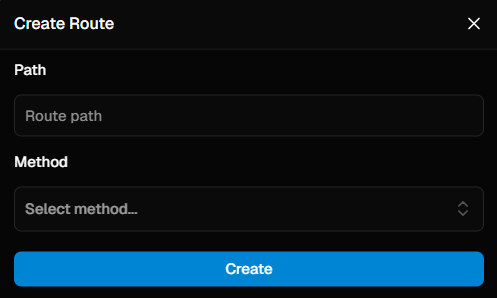
Click the **`+`** icon to open the API route configuration dialog.
Every API route needs two critical pieces of information:
* **Path Name:** The unique URL for your endpoint (e.g., `/users`, `/products`). This is the address that your application (or other services) will call.
* **Method:** The HTTP method the route will respond to. This defines the type of action the route performs:
* `GET`: **Retrieve Data.**
* `POST`: **Create New Data.**
* `PUT`: **Update Existing Data.**
* `DELETE`: **Remove Data.**
Once created, you can click on any page in the list to load it onto the
central canvas and begin designing its layout and content.
***
## API Routes: Powering Your Backend
API Routes are your application's connection to the server. They are essential for any task that requires secure or private logic, such as fetching user data, processing a payment, or connecting to another company's API.
Here's how to create one.
In the left panel, switch from "Pages" to the **API Routes** tab.
Click the **`+`** icon to open the API route configuration dialog.
Every API route needs two critical pieces of information:
* **Path Name:** The unique URL for your endpoint (e.g., `/users`, `/products`). This is the address that your application (or other services) will call.
* **Method:** The HTTP method the route will respond to. This defines the type of action the route performs:
* `GET`: **Retrieve Data.**
* `POST`: **Create New Data.**
* `PUT`: **Update Existing Data.**
* `DELETE`: **Remove Data.**
 ### Building API Route Logic
After creating an API Route, you must define what it does. Select the new route, then click the **Logic** tab in the top navigation bar. This opens the workflow editor for that route.
**Critical Rule: Always End Your Workflow with "Route Send Response"**
An API route's only job is to receive a request and send a response. The **`Route send response`** action is how you send that response.
* Every path in your workflow **must** end with this action.
* Both branches of any **Conditioner** must end with a separate `Route send response`.
Failing to do so will cause the client request to hang and eventually time out.
### Building API Route Logic
After creating an API Route, you must define what it does. Select the new route, then click the **Logic** tab in the top navigation bar. This opens the workflow editor for that route.
**Critical Rule: Always End Your Workflow with "Route Send Response"**
An API route's only job is to receive a request and send a response. The **`Route send response`** action is how you send that response.
* Every path in your workflow **must** end with this action.
* Both branches of any **Conditioner** must end with a separate `Route send response`.
Failing to do so will cause the client request to hang and eventually time out.