> ## Documentation Index
> Fetch the complete documentation index at: https://docs.saasio.io/llms.txt
> Use this file to discover all available pages before exploring further.
# Introduction to Workflows
> Learn the fundamentals of Saasio's Logic system. Understand how to use triggers and actions to create powerful, interactive workflows for your application.
***
You've designed a beautiful user interface. Now, it's time to make it work. Workflows are the engine of your application—they are the logic that runs when a user interacts with your UI.
Whether you're submitting a form, navigating to a new page, or fetching data from an API, everything is handled by a workflow.
***
## The Core Concepts
Every workflow in Saasio is built on three simple concepts:
This is the event that starts the workflow. Most commonly, it's a user
interaction, like **clicking a button**, **submitting a form**, or a **page
finishing loading**.
An action is a single, specific operation. It's one step in your workflow,
such as **"Go to page"**, **"Create new data"**, or **"Set data in state"**.
A workflow is simply a sequence of one or more actions that are executed in
order when a trigger occurs.
***
## Building Your First Workflow: Page Navigation
Let's create the most common workflow: making a button navigate to another page when clicked.
On the canvas, select the element that will trigger the workflow. In this case, it's our **Button** element. A selected element will have a blue outline.
With the button selected, click on the **Logic** tab in the top navigation
bar. This opens the workflow editor for the selected element's default trigger
(for a button, the trigger is "On Click").
We want to navigate, so:
* Open the **Navigation** category.
* Select the **"Go to page..."** action.
* A configuration panel will appear. In the `Select a page` field, select your desired destination page from the dropdown.
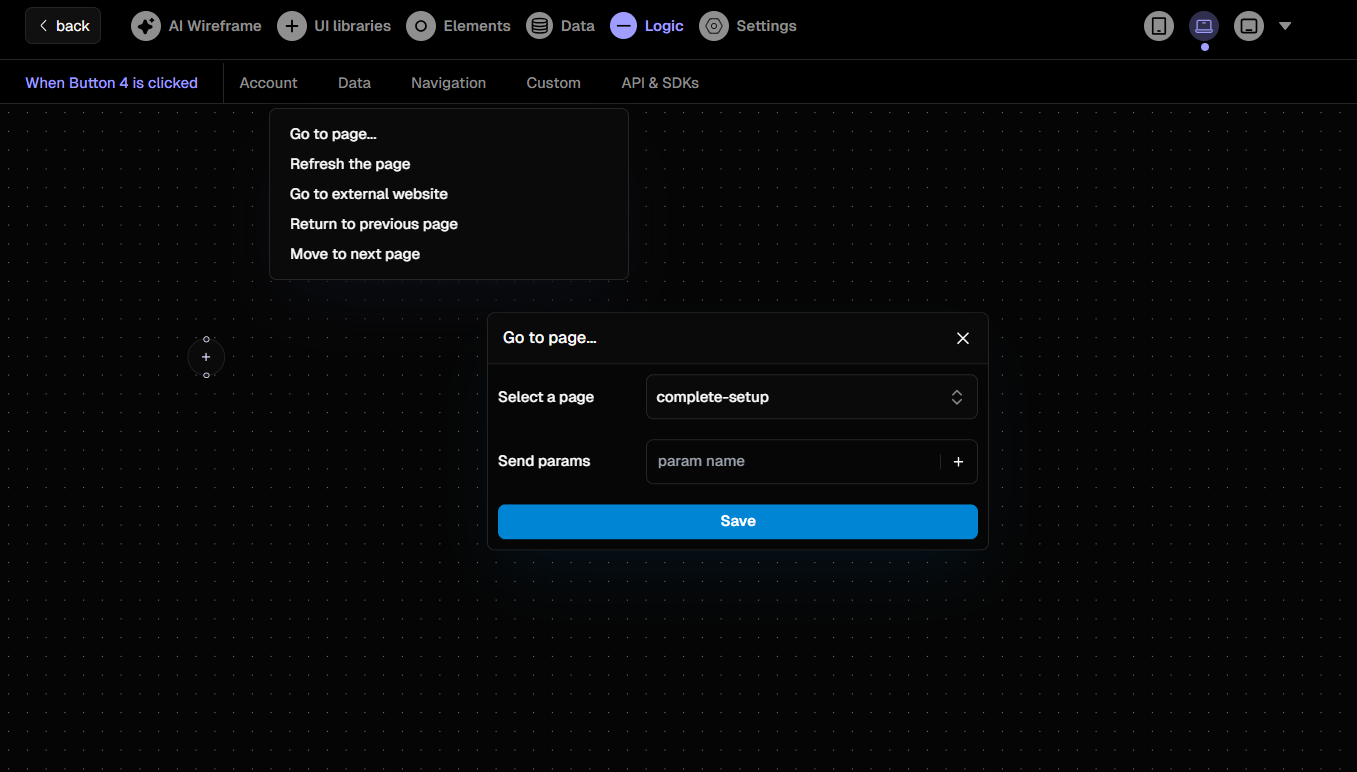 **That's it!** Now, when a user clicks that button in your live application, the "Go to page" action will run, and they will be redirected. You can continue to add more actions to this workflow to create more complex sequences.